How to create a Word or Excel template
The details provided on this page are intended for users designing and building Word templates. Information for Application Administrators about configuring Output jobs in Axiell Designer can be found here.
See also:
- General details about output jobs / formats can be found here.
- Details about configuring output jobs can be found here.
- Details about specifying the Thumbnail retrieval path for image fields (ensuring that a thumbnail image is retrieved and used in a report, keeping the document size relatively small) can be found here.
This information is only relevant for organizations that have moved from Adlib for Windows to Axiell Collections. It is not possible to reuse .dot or .dotx templates built for Adlib for Windows without some minor modifications:
- Open a new document based on your
.dot(x)file and save it with a.docxextension. - It is no longer possible to use a text box or a frame to restrict the size of printed images; instead it is necessary to use a preferred column width and an exact row height for a table cell to restrict the size of images printed within this cell. This cell can be part of a larger table or you can have a table consisting of a single cell. The aspect ratio of images will be kept intact and they will be printed within the cell in their entirety. Details about how to include images in your output below.
- Single-column or multi-column label templates for standard and non-standard label sizes on label sheets (to be printed to regular printers) are supported but only when set up as output formats explicitly. Single label-sized templates for continuous-feed label printers are supported as well and can be used on-the-fly if desired.
- The <<field_tag[occurrence].thumbnail|width=width_in_pixels>> notation to print thumbnails is supported.
- Email parameters are not recognized, so should not be used (although they will not spoil your printout).
- The <<[PageBreak]>> parameter is supported, but causes a page break exactly where the parameter is placed in the template, so always place it at the bottom. Templates that do not contain the <<[PageBreak]>> parameter or a table with the <<[StartRecordList]>> and <<[EndRecordList]>> parameters, which are also supported, print records directly below each other.
- Word document sections can be used for more complex documents; for each processed record, relevant data is appended to each section (so sections are not repeated for each processed record) and any sections are filled simultaneously.
More details can be found in the Application configuration options section of this Help.
With one or more records selected, your data is printed by selecting an output format from the Output formats box (details about how to print record data here). Output formats use Microsoft Word templates (with a .docx extension), Excel templates (with a .xlsx extension)1 or XSLT style sheets to specify what fields are included in the output, as well as to lay out and style the data. A number of output formats are available in Collections out-of-the-box, each designed for a specific printing / reporting purpose.
If these predefined output formats do not meet your needs, you can configure and use your own by building a custom Excel or Word template. As Excel output formats are fairly straightforward, we start with them:
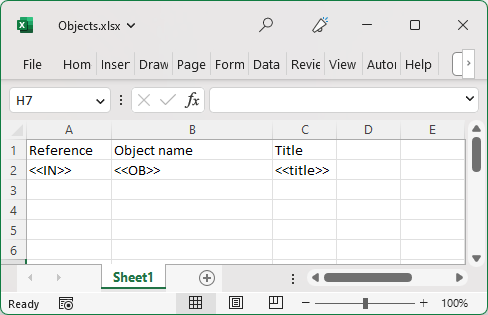
Add text as column headers (optionally), with field references (either field tag or system name) added to cells in a single row, for example:
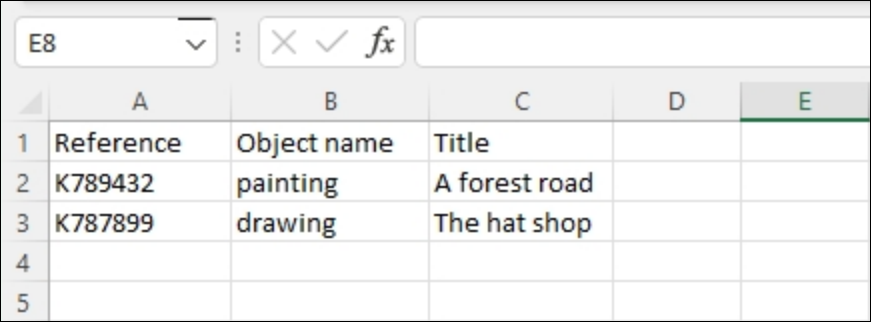
When the Excel template is used to output record data for printing, values from the records will populate a spreadsheet:
More details:
|
Field types, etc. |
Details |
|---|---|
|
As with the use of Word documents as output format templates, it is possible to print a specific occurrence of a field by specifying the occurrence number in square brackets after the field tag / name, e.g. All occurrences of a field will be printed if no number is specified, e.g. |
|
|
Images |
To include the thumbnail of an image, add an image field tag to a cell, e.g. Note: While it is possible to enlarge the image thumbnail (by dragging its corner), the resolution of the image is low and is unlikely to display well. |
|
The user-friendly translation in the current interface language is output. Fields in which values are selected from a drop list are called enumerative fields in Collections. Values in these fields are read-only; they are added and, in a multilingual system, translated by your Application Administrator in the Collections administration tool, Axiell Designer |
|
|
Numerical values |
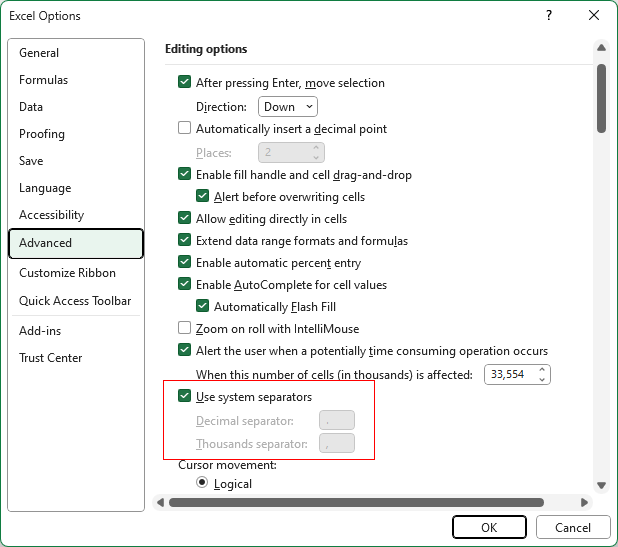
Numerical values are output with the default database decimal separator (usually a dot) and without a thousands separators so that Excel can interpret numbers correctly as numericals. |
|
Formulas |
Formulas can be included in a template to perform calculations with integer or numerical data that is output. Note:
|
|
It is not currently possible to create an adapl+Excel template output format (it is not yet possible to have printed data pre-processed by an adapl). |
To demonstrate, we build a basic Word template that prints the following data from one or more object records:
- object number
- object name
- creator
- title
- production dates
- current location
Note: If you replicate this example, it will only work if you print data from the Object catalogue data source![]() The management of a collection can involve a vast amount of information about objects / items / books, people and organizations, events, administration and more. This information is stored as records in data sources. Each data source stores a specific type of information: details about collection items, people, events, loans, and so on.. As you will see however, it is a simple matter to substitute other fields from any other data source.
The management of a collection can involve a vast amount of information about objects / items / books, people and organizations, events, administration and more. This information is stored as records in data sources. Each data source stores a specific type of information: details about collection items, people, events, loans, and so on.. As you will see however, it is a simple matter to substitute other fields from any other data source.
Familiarity with Microsoft Word is assumed:
- In Microsoft Word (2007 or higher), create a new document and save it with a descriptive name and a
.docxextension.Note: If your system has been set up to save custom templates and list them in the Output formats box automatically, the new output format will be listed using its file name by default.
- Add, style and lay out text in the template, just as you would in a normal Word document.
In this demonstration we add the following text, formatted with bold, to the document:
Object no.:
Object name:
Creator:
Title:
Dating: to
Location:
- Specify the data (fields) you want to include in the output.
To include data and/or images from your records in the output, you reference field(s) in the template by typing the system field name or tag between double angle brackets:
<<desired_field_name>> or <<desired_tag>>
Note: Always use English system field names: if necessary, switch the Interface language to English before checking the system field name. Alternatively, use the field tag, which is the same in all languages.
System field names and tags are case-sensitive and they must be typed exactly as they have been defined in your system:
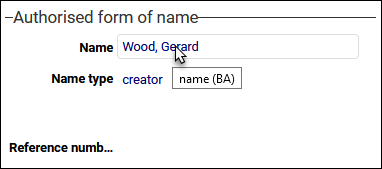
For instance, if you were referencing a creator's name, you would specify <<name>> of
<<BA>>.Note:
- Only include fields from the current data source
 The management of a collection can involve a vast amount of information about objects / items / books, people and organizations, events, administration and more. This information is stored as records in data sources. Each data source stores a specific type of information: details about collection items, people, events, loans, and so on., plus merged-in fields.
 - Tags starting with
%are allowed.
In our example, we use field tags rather than system field names, and apply formatting to some bracketed field references:
Object no.:
<<IN>>Object name: <<OB>>
Creator: <<VV>>
Title: <<TI>>
Dating:
<<DS>>to<<DE>>Location: <<2A>>
Any styling you apply to the bracketed field names / tags will apply to the data when it is output and printed. In the example above, we have applied italics to the title field reference:
Title: <<TI>>
When the template is used, titles in your printed output will be similar to:
Title: Throwing Stick (Jandamarra's Boomerang)
- Only include fields from the current data source
-
It is possible to print a specific occurrence
 If a field in the current record can have more than one value, we add an occurrence of the field for each value (e.g. a book can have multiple authors so we add an occurrence of the author.name (au) field for each author). An occurrence can be a member of a group of fields, and adding an occurrence of the field adds all members of the group at once. or to print all occurrences of a field.
A specific occurrence is indicated by the occurrence number between square brackets. For example, to print the first occurrence of tag
VV:Creator:
<<VV[1]>>Note: If the specified occurrence does not have data, nothing will be printed for that field reference.
To print all occurrences of the field, do not include a bracketed number:
Creator:
<<VV>>Each field occurrence will be printed in its own paragraph, and any field label in the same paragraph (Creator: in the example above) will be repeated.
In our example we now have:
Object no.:
<<IN[1]>>Object name: <<OB[1]>>
Creator: <<VV[1]>>
Title: <<TI[1]>>
Dating:
<<DS[1]>>to<<DE[1]>>Location: <<2A[1]>>
Note: If a field is not repeatable (it can only hold a single occurrence), there is no need to specify which occurrence to print, although it does not matter if you do.
-
To print each record on a separate page, add the page break reference, which gives us:
Object no.:
<<IN[1]>>Object name: <<OB[1]>>
Creator: <<VV[1]>>
Title: <<TI[1]>>
Dating:
<<DS[1]>>to<<DE[1]>>Location: <<2A[1]>>
<<[PageBreak]>>
- It is possible to layout your data in a table. This is handy for field groups that often have multiple occurrences, such as the Dimensions field group on the Physical characteristics panel for object records (e.g. Object catalogue). To include the Part, Dimension, Value and Unit fields, we could add the following table to our template:
Part
Dimension
Value
Unit
<<DL>><<DI>><<WA>><<EE>>Typically we want to print all occurrences of the repeated field group, so we do not add an occurrence number. When the template is printed, a table row will be added for each field group occurrence.
- Save the template.
Our
.docxnow appears as follows: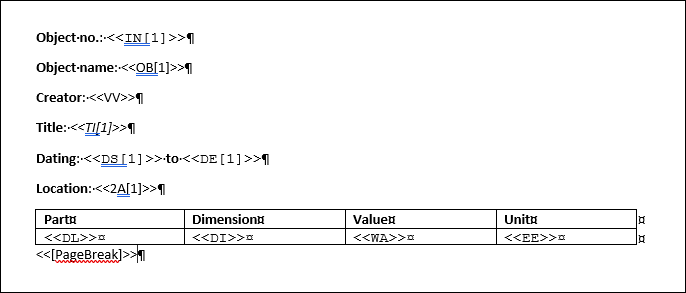
Test the template by clicking the ellipsis beside Find Word template in the Output formats box and locating your new template (see How to print your record data for details about how to use an output format to print your record data). The output will appear similar to this:
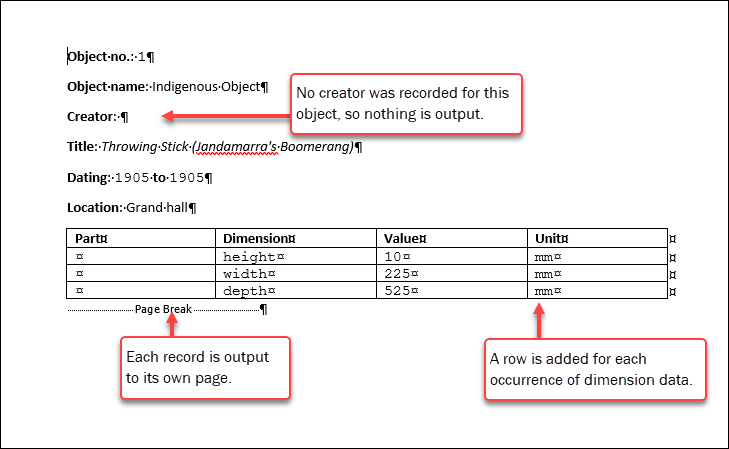
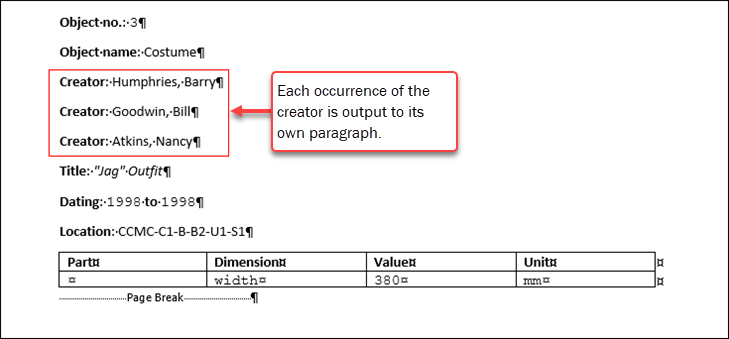
The following is a variation of the basic template:
Field references can be placed in between other text, or anywhere else on a page. Here we see a standard letter template for Persons and institutions:
To: <<name>>
<<address[1]>>
<<address.postal_code[1]>> <<address.place[1]>>
Axiell ALM Netherlands BV
Safariweg 18-22
3605 MA Maarssen
Re: new service pack
Dear <<contact.name[1]>>,
We enclose information about the release of our new service pack, in which some major improvements have been made.
We trust this has provided you with sufficient information,
The Axiell Helpdesk
<<[PageBreak]>>
When this template is used, the text will be repeated for each selected records and the field references will be replaced with data from each record in turn. As we have included the <<[PageBreak]>> parameter, the letter generated for each record will be on a new page
Note that some field names include an occurrence![]() If a field in the current record can have more than one value, we add an occurrence of the field for each value (e.g. a book can have multiple authors so we add an occurrence of the author.name (au) field for each author). An occurrence can be a member of a group of fields, and adding an occurrence of the field adds all members of the group at once. number, e.g.:
If a field in the current record can have more than one value, we add an occurrence of the field for each value (e.g. a book can have multiple authors so we add an occurrence of the author.name (au) field for each author). An occurrence can be a member of a group of fields, and adding an occurrence of the field adds all members of the group at once. number, e.g.: [1]. A specific occurrence is indicated by the occurrence number between square brackets. For example, to print the first occurrence of tag VV:
Creator: <<VV[1]>>
Note: If you do not include the bracketed number, all occurrences of the field will be printed.
If a field is not repeatable (it can only hold a single occurrence), name in the example above, there is no need to specify which occurrence to print, although it does not matter if you do.
With the basics of building a Word template covered, there are a number of more advanced options available:
This is an alternative to the letter format described above. Records are listed in a table, one per row, and within each row, occurrences are listed one above the other.
When you add a record list table to a Word template, the table must be the only thing in the template.
For this example, the record data is presented in a single table. To achieve this, all field references are specified in a single row and the <<[StartRecordList]>> / <<[EndRecordList]>> parameters must be included in the rows above and below the field references row. In this example, we add column headers in the top row (this is optional); the title(s), author(s) and document type from records in the Library catalogue will be listed in a table:
|
Title |
Author |
Document type |
|---|---|---|
|
<<[StartRecordList]>> |
|
|
|
<<TI>> |
<<ya>> |
<<df>> |
|
<<[EndRecordList]>> |
|
|
Note that it is not necessary to present your record data in a single table.
It is possible to present the data for each record in its own table, which will accommodate a more complex presentation of the data across multiple rows and columns. To achieve this, do not include the <<[StartRecordList]>> / <<[EndRecordList]>> parameters.
In this case, it is important that Text wrapping is set to None in the Table properties dialogue: select Properties on the Layout tab of the Ribbon and confirm that Text wrapping is set to None (it should be by default). If Text wrapping is not set to None and a fixed position has been specified for your table, you will find that tables will display on top of each other when your record data is printed.
When this template is used, all occurrences of the fields are output in a table, each in a separate paragraph, within a single cell. For example:

- To only print a specific occurrence
 If a field in the current record can have more than one value, we add an occurrence of the field for each value (e.g. a book can have multiple authors so we add an occurrence of the author.name (au) field for each author). An occurrence can be a member of a group of fields, and adding an occurrence of the field adds all members of the group at once., add the required occurrence number after the field tag, e.g.:
 <<ya[1]>>. - More than one field reference can be included in a cell, along with any fixed text.
- The header row is optional. Use Word's Repeat Header Rows option (on the Layout tab of the Ribbon) to repeat the header if the output table crosses two or more pages.
- Table borders can be styled or hidden; cells can be shaded and their alignment specified, etc.
- A nested table can be inserted into any of the cells in the row with field references (e.g. the table holding occurrences of the dimensions field group we built above could be included in a cell in a record list table.
- Rows can be numbered sequentially by inserting an automatic number in an empty cell of the field references row. Use Word's Numbering function for numbered lists:

The output is now:

-
In the Table properties dialogue for your table (select Properties on the Layout tab of the Ribbon), be sure that Text wrapping is set to None (it should be by default).
If Text wrapping is set to None and you have not included <<[StartRecordList]>> / <<[EndRecordList]>> in your table (so that each record is presented in its own table), and a fixed position has been specified for the table, you will find that tables will display on top of each other.
- Only one row of field references can be included in the table.
- Fixed text can only be used inside the table and it can only appear in the header row (column headers) and in the row with the field references. In other words, when you build a record list table, it must be the only thing in your Word template.
- Do not use <<[StartRecordList]>> and <<[EndRecordList]>> in conjunction with <<[PageBreak]>>.
Images can be included in your printed output by placing the reference for an image field in your Word template. The field must have a data type of IMAGE (see Below you will find an explanation of many of the properties listed in the Field properties box. Field properties are defined in Axiell Designer and Application Administrators will find full details about all field properties in the Axiell Designer Help. for details about how to identify a field's data type).
A reference to an image field can be included in a Word template in several ways, with different results, although the aspect ratio of each image will always remain intact.
If an image field reference is placed in a paragraph, the image will scale to fill the available space (i.e. as far as the page size allows).
Including images in printed output generally involves a trade-off between image quality and document size. The larger the images retrieved for the report, the larger the document and, as a result, the longer the print time.
The thumbnail and width parameters can be declared in the image field reference to retrieve a thumbnail image from the server and restrict the printed image size.
Note: This is the only way to customize image size in labels on label sheets.
Any height parameter is ignored in order to maintain the aspect ratio (and you cannot provide a height and no width).
The format of a field reference for a size-limited thumbnail image is:
<<field_tag[occurrence].thumbnail|width=width_in_pixels>>
Example:
<<FN[1].thumbnail|width=270>>
Unfortunately, using the image reference field without the thumbnail parameter, e.g.:
<<FN[1]>>
retrieves the same, typically low resolution thumbnail image file, scaling it to fit the available space with the result that the printed image may be poor quality and blurred.
To ensure that the high quality version of an image is used when printing a report, add the image parameter to the image field reference, e.g.:
<<FN[1]|image>>
When the image is placed on a page / in a table cell, the requested file is scaled to the available space.
Alternatively, use the width parameter to control the print size. Any height parameter is ignored in order to maintain the aspect ratio (and you cannot provide a height and no width):
<<FN[1]|image|width=500>>
To ensure that document size (and therefore print time) is relatively small by default, if the image parameter is not used, e.g.:
<<FN[1]>>
a thumbnail image will be retrieved using the Thumbnail retrieval path setting specified for the image field (details in the Axiell Designer Help![]() A tool for designing, creating, customizing and managing Axiell Collections applications and databases, broadly speaking, the Axiell Collections Model Application. As well as managing databases, including user access and permissions, Designer is used for such tasks as translating field labels, tooltips, values in drop lists, etc. here).
A tool for designing, creating, customizing and managing Axiell Collections applications and databases, broadly speaking, the Axiell Collections Model Application. As well as managing databases, including user access and permissions, Designer is used for such tasks as translating field labels, tooltips, values in drop lists, etc. here).
Note: The thumbnail parameter previously used to retrieve a thumbnail image is now obsolete and does not need to be declared.
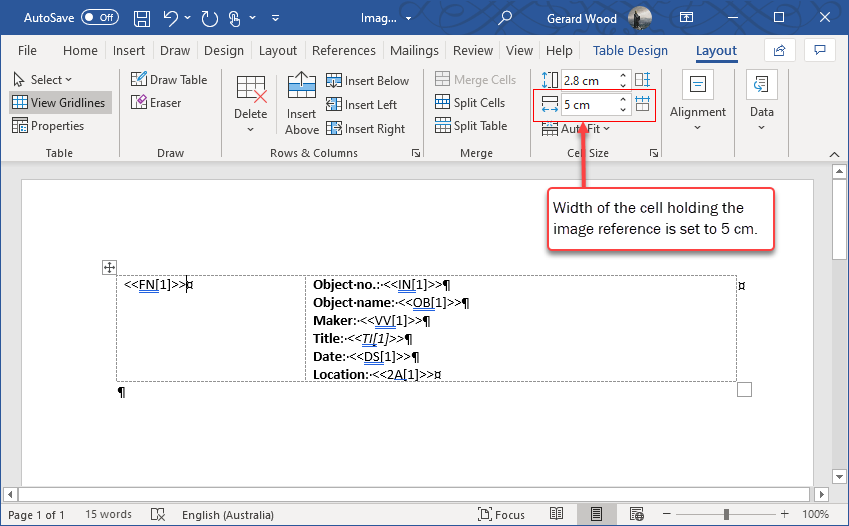
Alternatively, insert the image field reference in a table cell and specify a preferred column width (a fixed value, not a percentage); this will limit the maximum width of the image to the width of the column.
The height of the row can also be specified by setting an exact row height in the row properties or leave the row height unspecified to keep it flexible. The additional height restriction might scale images even further down. To make sure a fixed number of records is printed on a page, it is best to limit the row height so that tall images will not mess up your layout.
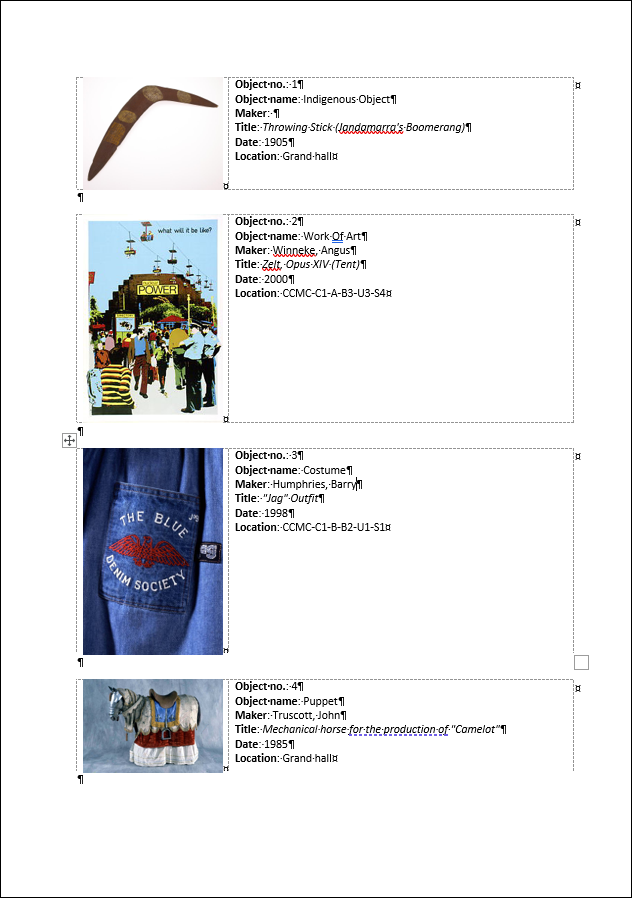
The following template with a two-cell table would generate a document like the one below:
Note: This method cannot be used to customize image size in labels for regular printers because a label (sheet) template consists of a large table that cannot contain nested tables.
IDs, such as object numbers, can be converted to a barcode during printing. There are two methods to achieve this: native barcode / QR code printing and third-party barcode font printing.
The following barcode and QR code types are supported:
|
Barcode / QR type |
Details |
Dimensions |
|---|---|---|
|
|
Can only convert letters, numbers and the following symbols:
|
For barcodes it is necessary to provide a width and height (in pixels). Note:
|
|
|
||
|
|
Can convert all 128 characters of ASCII. |
|
|
|
These three barcode types contain strict rules. If the barcode does not conform to these, the barcode will not be printed. |
|
|
|
||
|
|
||
|
|
|
Only a single dimension is required. |
When specifying an ID (or number) field reference in the Word template, indicate which type of barcode to print and the dimensions in which it will display. The barcode will fill the specified dimensions exactly: in other words, if the ID is short, the resulting barcode will have wider bars than if the ID is long. It may be necessary to experiment with the dimensions to determine if barcodes fit the label or page and if your barcode field data results in barcodes that can be read by your barcode scanner.
Note: There is a limit to how small a barcode can be: if you set the width too small, the barcode will print wider anyway.
The format of a field reference for a barcode is:
- Versions of Collections prior to 1.16 (use a dot to separate the field tag and barcode type):
<<field_tag[occurrence].barcode_type|width=width_in_pixels|height=height_in_pixels>>
Examples:
<<ba[1].code39|width=270|height=77>>
<<Nn[1].code128|width=300|height=100>>
- Collections 1.16 onwards (use a
|to separate the field tag and barcode type):<<field_tag[occurrence]|barcode_type|width=width_in_pixels|height=height_in_pixels>>
Examples:
<<ba[1]|code39|width=270|height=77>>
<<Nn[1]|code128|width=300|height=100>>
Note: The occurrence number is mandatory.
Dithering
Barcodes are generated as images and may therefore be affected by dithering, which can make it hard for scanners to scan the barcode. If this is the case, turn off dithering in your printer preferences. How you do so will depend on your printer.
For example: open Control panel >Devices and printers, right-click your printer and select Printing preferences. On the Dithering tab, set the Dithering type to None. This ensures the cleanest print of the black and white lines.
This method requires a third-party barcode font to be installed on the computer from which the user will print2.
Note: Currently, code128 does not work with Collections in conjunction with a third-party font. code39 barcode fonts do work.
Enter the field reference, an object number for instance, in the Word template; a barcode can be printed in its own paragraph or inline:
<<IN>>
Some experimentation may be necessary to determine which part of the field reference the font is applied to. In our test, if the field reference was in its own paragraph, the whole paragraph had to be selected and the barcode font applied to it. For example:

If the field reference was placed inline, we selected the whole field reference and applied the barcode font. For example:

Enlarge the font size to obtain a properly sized barcode. The << and >> characters themselves will not be converted or printed when you use a code39 barcode font.
To print a human-readable version of the ID / number as well, simply insert <<IN>> in a normal font underneath the converted field reference.
It is possible3 to include checkboxes in your output. A checkbox is not linked to a field and it does not perform any function other than to be selectable / clickable: it is either unchecked or checked. The label you provide alongside the checkbox gives it context and purpose.
In this example, when the Word template is output, the resulting document will include the description of an object and a checkbox in which the reader can indicate that they have checked / confirmed the description:
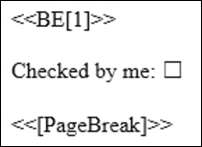
Amongst other uses, adding a checkbox to a report can provide an approval mechanism. For example, the document should only be printed to paper once the document has been checked and approved by marking the checkbox. It is important that the document is saved after marking the checkbox otherwise it might be saved with a deselected checkbox.
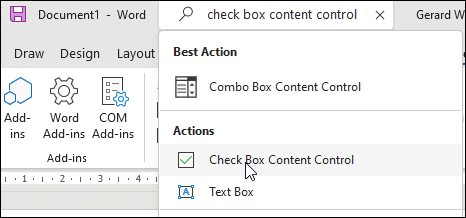
This type of checkbox is called a Check Box Content Control and it is found on the Developer tab in Word:
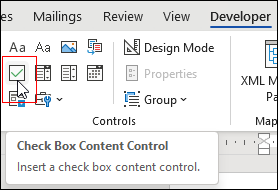
Details about adding the Developer tab to the Ribbon can be found here.
Alternatively, search for check box content control in the Search bar in Word and select the option from the results to add to your template:
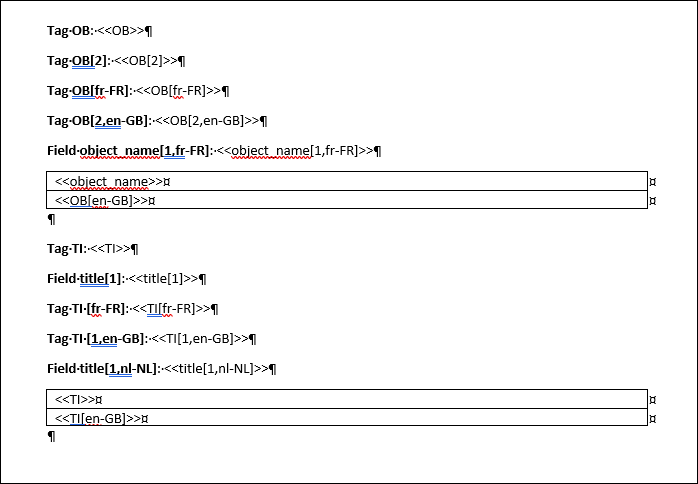
In a multilingual system, it is possible to specify in which language the data in a multilingual field will be output by including a data language code in the field reference, e.g. nl-NL for Dutch or en-GB for British English:
<<title[nl-NL]>>
If no data language code is included, data is output in the data language currently set in Collections.
To also specify an occurrence![]() If a field in the current record can have more than one value, we add an occurrence of the field for each value (e.g. a book can have multiple authors so we add an occurrence of the author.name (au) field for each author). An occurrence can be a member of a group of fields, and adding an occurrence of the field adds all members of the group at once., the occurrence number and language code are placed together between square brackets. For example:
If a field in the current record can have more than one value, we add an occurrence of the field for each value (e.g. a book can have multiple authors so we add an occurrence of the author.name (au) field for each author). An occurrence can be a member of a group of fields, and adding an occurrence of the field adds all members of the group at once., the occurrence number and language code are placed together between square brackets. For example:
<<OB[2,en-GB]>>
will output the English value of the second occurrence of field OB.
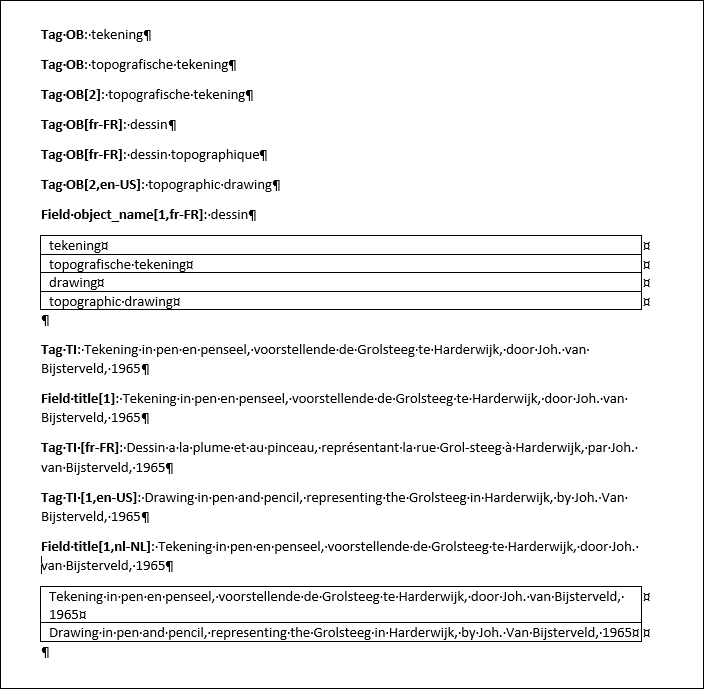
To demonstrate, we have a multilingual system in which data can be entered in Dutch, English and French in the Object name and Title fields. Here we see data from a record containing two object names and a title in all three languages:
|
Language |
Object name ( |
Title ( |
|---|---|---|
|
Dutch ( |
(occurrence 1): tekening (occurrence 2): topografische tekening |
Tekening in pen en penseel, voorstellende de Grolsteeg te Harderwijk, door Joh. van Bijsterveld, 1965 |
|
English ( |
(occurrence 1): drawing (occurrence 2): topographic drawing |
Drawing in pen and pencil, representing the Grolsteeg in Harderwijk, by Joh. Van Bijsterveld, 1965 |
|
French ( |
(occurrence 1): dessin (occurrence 2): dessin topographique |
Dessin a la plume et au pinceau, représentant la rue Grol-steeg à Harderwijk, par Joh. van Bijsterveld, 1965 |
The following template demonstrates the possibilities of explicit or implicit printing of a language value and occurrence. All field occurrences will be printed if a specific occurrence number is not provided:
Here we see the output if the current data language is Dutch:
Invariancy![]() In a multilingual environment an invariant value is one that displays in any available language until a translation is provided: if an invariant value is English and it has not been translated into French, the English value will display when the Data language is French until a French translation of the value is provided. will play a role:
In a multilingual environment an invariant value is one that displays in any available language until a translation is provided: if an invariant value is English and it has not been translated into French, the English value will display when the Data language is French until a French translation of the value is provided. will play a role:
- You specify a data language in a field reference in the template: if a value in that language is present, it is printed; if not, and a value in the invariant language is present, the invariant value will be printed; otherwise no value is printed.
- You do not specify a data language in a field reference for a multilingual field: if a value in the current data language is present, it is printed; if not, and there is a value in the invariant language, that will be printed instead; otherwise no value is printed.
Details about configuring the output format for a label sheet template can be found here.
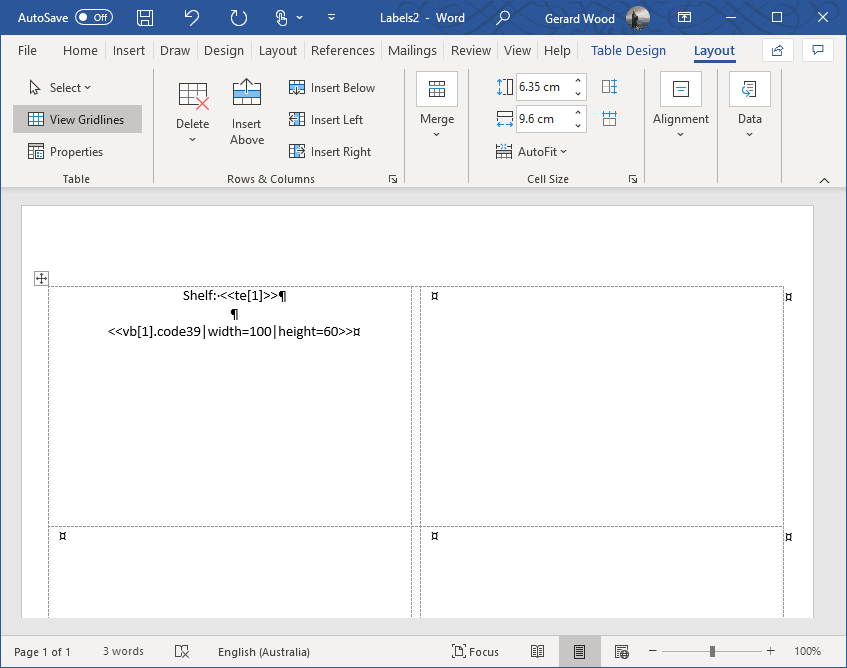
Here we describe how to build a Word template for printing to single or multi-column label sheets. Unlike other .docx templates, a label sheet template cannot be used ad-hoc (by selecting the ellipsis beside Find Word template in the Output formats box) as it must be configured by an Application Administrator in Axiell Designer![]() A tool for designing, creating, customizing and managing Axiell Collections applications and databases, broadly speaking, the Axiell Collections Model Application. As well as managing databases, including user access and permissions, Designer is used for such tasks as translating field labels, tooltips, values in drop lists, etc. (details here)
A tool for designing, creating, customizing and managing Axiell Collections applications and databases, broadly speaking, the Axiell Collections Model Application. As well as managing databases, including user access and permissions, Designer is used for such tasks as translating field labels, tooltips, values in drop lists, etc. (details here)
To create a Word template for a label sheet output format:
- In Microsoft Word (2007 or higher), create a new document.
- Select Labels on the Mailings tab of the Word Ribbon.
The Envelopes and Labels box will display.
- On the Labels tab, leave the Full page of the same label option selected even if you only mean to print one or just a few records. Do not enter anything into the Address field.
- Click the Options button and set the size of your labels and the number of labels that fit on a page by selecting a Label vendor and then the Product number of your label sheets:
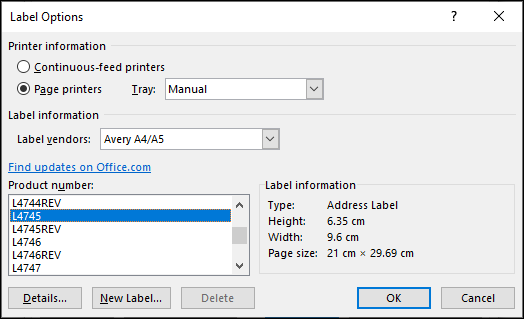
Tip: You can also define a custom label type via the New label button.
-
Click OK to close the Label options tab.
- Select the New document button on the Labels tab of the Envelopes and labels box.
A new Word document opens containing a single page of labels in the specified layout.
- Enter any fixed text, field references and barcode and/or image references in the upper left cell of this document only:
- You cannot use parameters (e.g. <<[PageBreak]>> or include tables in the template.
- Images: the size of images cannot be controlled by placing the field reference in its own single cell table because a label (sheet) template consists of a large table that cannot contain nested tables.
It is possible to restrict the printed image size with the thumbnail and width parameters in the field reference.
Any height parameter is ignored in order to maintain the aspect ratio (and you cannot provide a height and no width).
The format of a field reference for a size-limited image is:
<<field_tag[occurrence].thumbnail|width=width_in_pixels>>
Example:
<<FN[1].thumbnail|width=270>>
Note: Using the thumbnail parameter does not improve performance as the image is retrieved in its original size and then resized.
- The document needs to be saved to the \Worddoc\templates folder on the server for your Collections application. If you have access to this folder, save the document with a descriptive name and a
.docxextension, otherwise save it locally and give it to your Application AdministratorNote: The Application Administrator must set up this template as an output format in your application before it can be used.
As usual when using a Word-based template, the resulting Word document will open in MS Word, where it can be edited if required. Note that when printing the document, you may have to select the printer that contains label sheets. Records will be printed on the labels from left to right, top to bottom.
It may be possible to print Word documents containing images (printed in black and white) and/or barcodes to your continuous-feed label printer4. This requires a label-sized Word template, which can be used ad-hoc (by clicking the ellipsis beside Find Word template in the Output formats box) or setup by your Application Administrator as a predefined output format (listed in the Output formats box).
The challenge: matching Word document properties and printing preferences
When printing in Word it is important that your template page size matches the label page size as set up in the printer's printing preferences, and the page's orientation is the same in both environments. If they do not match, Word will automatically change margins and will generate warnings about non-matching page sizes and margins when you try printing.
There is a long-standing issue that prevents printing from within Word in the printer's portrait mode (horizontally printed text) when the labels are wider than they are high, as here:
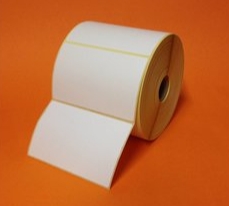
and likewise prevents printing in the printer's landscape mode (text printed sideways / vertically) when the labels are taller than they are wide.
When designing a continuous-feed label template you will find that when the page height is set to match the label's height and the page width to match the label's width, Word automatically adjusts the setting of the page's orientation to landscape if the label is wider than it is high or to portrait if the label is taller than it is wide: for Word this is an issue of the page's orientation.
Your printer however appears to interpret its orientation setting in terms of the text on the label (no matter the height and width of the label), where portrait means horizontally printed text and landscape sideways / vertically printed text. During the design phase and during printing this causes problems because Word expects the printer's orientation to mean the same thing as its own page orientation. And thus Word finds that the height, width and margins do not match and will not allow you to lay out your template as you would like and/or generates warnings and prints data and text in the wrong place on the label.
There is a workaround, but it is a little awkward:
To print horizontally to labels that are wider than they are high, it is necessary to change the printer's printing preferences (Control panel>Devices and printers, right-click your label printer and select Printing preferences) by changing the height of the label to a value bigger than the width.
Thus, if the Width on the Options tab is 10.2 cm, you change the Height to something like 10.5 cm and leave the Width and portrait setting as they are:
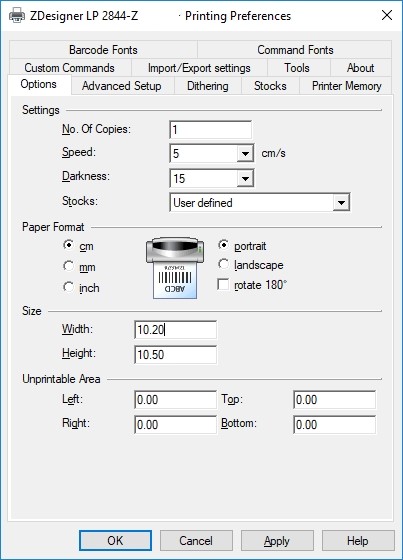
This will allow us to create a Word template in portrait orientation as well, while still being able to print horizontally and have matching page dimensions.
Note: The page size you set in the Printing preferences does not appear to have any impact on other printing actions to this printer (as far as our testing showed), so there should be no harm in these adjustments; otherwise you can always temporarily restore the page height to its original setting.
Dithering
If the output includes barcodes, note that barcodes are generated as images and may therefore be affected by dithering, which can make it hard for scanners to scan the barcode. If this is the case, turn off dithering in your printer preferences. How you do so will depend on your printer.
For example: open the Control panel >Devices and printers, right-click your printer and select Printing preferences. On the Dithering tab, set the Dithering type to None. This ensures the cleanest print of the black and white lines.
Creating the Word template
If the issue described in the paragraphs above is an issue, first fix it by adjusting the label height in the Printing preferences as described.
Now we create a normal .docx template with a page size that matches the label size that your printer uses (as set up in the printer's Printing preferences) regardless of the actual size of the physical labels.
Match the page size of your .docx template to the size in the Printing preferences page Width and Height: in Word go to Size>More paper sizes in the Layout tab of the Ribbon, and on the Paper tab set the Page size to Custom size and change the Width and Height accordingly. On the Margins tab you will see that the Orientation is now Portrait, as we wanted it to be. You can change the margins to your liking:
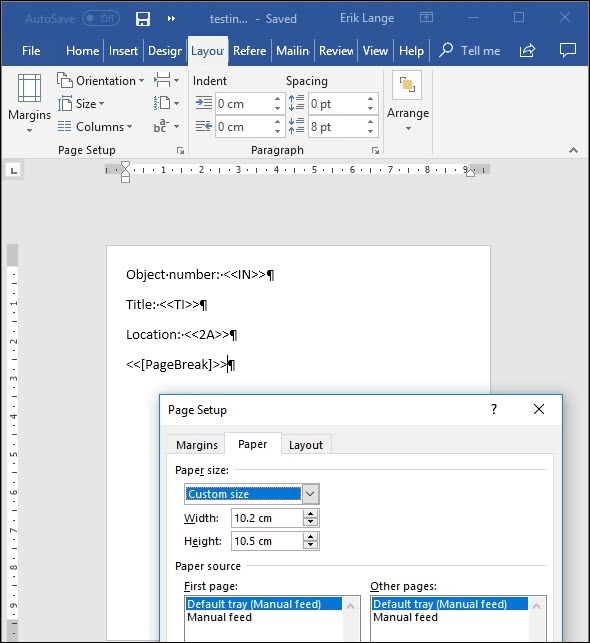
You can fill your template normally with field references, fixed text, a logo maybe, a table cell with an image reference and/or a barcode field reference as described above. Use a <<[PageBreak]>> parameter to make sure that each record is printed on a separate label. Of course, remember that the physical labels are not as tall as your current template would suggest, so only fill the upper part of your template with field references and any other content: you do not want the contents to spill over to the next printed label. The vertical ruler on the left gives an indication of the vertical space your field references occupy.
Printing from within Collections and Word
As usual when using a Word-based template, the resulting Word document will open in MS Word, where it can be edited if required. Note that when printing the document, you may have to select the printer that contains label sheets.
